Tuesday, January 24, 2012

Pineapple Upside-down Cupcakes

My 5 year old went to the grocery store with me yesterday and insisted that we get a pineapple.  He does this frequently, as we LOVED pineapple in Hawaii.  Due to the fact that the pineapple was staring at me from the counter, I was hungry, and I was going through withdrawals from not having baked anything in over a week, I decided to make some pineapple upside-down cupcakes.  (recipe to follow) A couple of years back my MIL gave me the cutest "cakelet" pan, especially made for pineapple upside-down cakelets. I was able to put it to good use as well as make 6 regular cupcakes. 
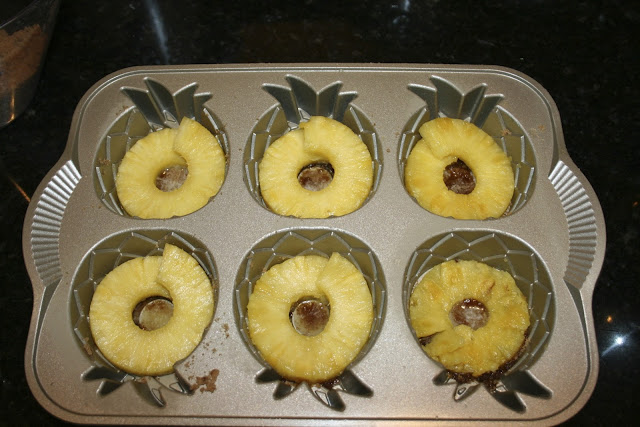
In the bottom of the pan, sprinkle some brown sugar, drizzle melted butter over it, and place a pineapple slice on top. 
For the cupcakes, I put pineapple chunks, since the slice wouldn't fit.
 
Next, pour the batter over the pineapple, sugar, and butter.
 Bake for 20-22 min
 Don't they look yummy?
 Next I whipped up some pineapple buttercream and topped them with a pineapple chunk and toasted coconut.

 Yes, they tasted as fabulous as they look!
HT-18 will be enjoying these little babies tomorrow.  (Drew is taking them to work)


CUPCAKES:
1/2 cup butter, softened + 1/4 cup melted
1 1/2 cup all purp. flour
1 1/2 cups sugar
2 eggs
1/2 t pure vanilla extract
1 t baking powder
1/2 t salt
3/4 cup buttermilk 
3/4 cup brown sugar
pineapple slices (reserve juice for buttercream)


In mixer: Beat butter; add sugar until light and fluffy.  Add eggs one at a time; add vanilla
In separate bowl: combine four, baking powder, salt
Add flour mixture to butter mixture, alternating with buttermilk.  (Start with flour and end with flour)


In the bottom of the greased pan:  sprinkle some brown sugar, enough to coat bottom and drizzle melted butter.  Place pineapple slice over brown sugar and butter.  Pour batter on top.  
Bake at 350 degrees for 18-22 min; until toothpick comes out clean.  


PINEAPPLE BUTTERCREAM:
1/2 cup butter, softened
2 T pineapple juice (I used 4)
3 1/2 cups powdered sugar

Monday, January 23, 2012

Buttercream

I've had several requests to post my buttercream recipe.   It's pretty simple.  I have several variations, so I"ll explain below.  


If I'm decorating a cake and need perfectly white color:
1 cup crisco (totally use the sticks....they are WAY easier!)
1 T clear, butter flavoring
2 t vanilla flavoring (or almond- or one of each)
4 cups powdered sugar
2-4 T water (You may have to use more or less.  Use your judgement to reach the consistency you want.)


Now, if I'm making cupcakes with colored or flavored icing, then I substitute REAL BUTTER for the crisco and eliminate the butter flavoring.  I also substitute whole milk for the water.  


Another variation: use 1/2 c crisco and 1/2 cup butter.  


*A word to the wise:  If you or your cupcakes/cake will be out in the hot hot sun....please don't make your icing with butter.  It melts! :)


Now, I've never tried "REAL"Italian buttercream.  It's on my "to-do" list in the very near future and I can't wait!  I hear it's a pain and a very long process, but totally worth it.  I'll be sure to let you know how it goes.

Friday, January 13, 2012

Cake Pops

I had some leftover cake scraps in the fridge, from the baby shower cake, so I decided to make cake pops.  I mean, what else can you do with the tops of cakes that you level off besides make them into cake pops? Spoon leftover buttercream on them and eat them by the hand fulls?  Cake pops are the best choice!  I was in a hurry, so I didn't do anything fancy.  I just dipped them in some red candy melts and packaged them together in 3's to hand out at school.
They weren't cute like the ones I made for Andrew's teacher on her birthday...
Not creative, like the "Monster Pops" for Halloween
Not even hand molded "Eve Pops" for Andrew's WallE party.... (Those were tough!)
I apologize for the quality.  That was a pre-smartphone cell phone photo!
I just stuck with the plain Jane red ones, which are MUCH faster to make.  LOL  

So, how do you make a cake pop, you say?  Simple!  
Step 1: Crumb up a cake (or cake scraps)
Step 2:  You have a couple of options here.
        A: Mix in your favorite frosting or do what I do, thanks to a tip from a BFF:
        B:  Mix in your favorite flavor of coffee creamer.  
COFFEE CREAMER?  YES!  Personally, I either use Italian Sweet Cream or Belgian Chocolate Toffee.  I have used cinnamon vanilla for vanilla cake before, but you know I'm more of a chocolate girl.   I don't measure how much I put in there, just eye ball it.  But BEWARE: don't put too much or you'll end up with a gooey mess and the balls won't stick together!
Step 3: Roll cake/icing and/or coffee creamer mixture into balls.  
Step 4: Put them in the freezer for about 20-30 minutes; just long enough to harden.  You don't want them to freeze completely.  
Step 5: Following the directions on the package, melt "candy melts" in a microwave safe bowl. (What?  You have to say that or someone out there will put aluminum in the microwave!)
Step 6: Dip cake balls into melted chocolate (candy melts).  You can either use toothpicks to dip or use lollypop sticks.  
Step 7: Gently tap off excess chocolate and stick the pop in a block of styrofoam (or the handy dandy cake pop decorator by Wilton.)
Viola! You have cake pops. 

I plan on making some for Andrew's Valentine party at school.  I saw a picture online at CakePop Gallery that I'm going to try.  Pigs!  Be My Valen-SWINE!...Get it? :)

Wednesday, January 11, 2012

Peanut Butter Banana Cupcakes

Tonight I got hungry.  I needed something sweet.  So after dinner, I started rummaging the kitchen to see what I had in there.  In the fridge I had some leftover peanut butter buttercream.  On the counter sat a near rotten very ripe banana.  That made the perfect combination to make a peanut butter banana cupcake.  
I have the most perfect recipe for banana cake E.V.E.R.  I dare you to try and find one better.  (Seriously, please try and report back if you happen to find one better because I'd love to have it!) This recipe comes from the Mount Calvary Baptist Church cookbook courtesy of Ms. Diane Pickers.  This is my favorite cookbook, not because of all the delicious recipes it contains, but because of the people who contributed to it.  This is the church where I grew up, so each time I make one of these recipes, I get to think about the person who submitted it and it always brings back such great memories.  For instance, Ms Diane was always a youth chaperone (and cook) whenever the youth group took a trip.  She would always wake us up in the mornings with her famous "Uppy Puppy" routine.  (You had to be there!)
Anyway, back to the cupcake...
Ingredients:
1/2 c. butter
1 1/2 c sugar
2 eggs
1 c or 2-3 mashed bananas (The riper the better.  If it's covered in spots, turning brown, and looks like it's on the verge of throwing away...it's PERFECT!)
1 1/2 c AP flour
1 tsp baking soda
1/4 c buttermilk (I think the buttermilk makes this recipe!)
1 tsp. vanilla
1/2 c. chopped pecans (optional, but I ALWAYS add them!)


Cream together butter, sugar, eggs, and bananas.  Add remaining ingredients. (See, this is another reason I like this recipe...it's simple!)  Bake in a greased/floured tube pan at 350 degrees for 40-45 min. 
For cupcakes: 22 min.


And now for the best part: the browned butter glaze!
2 T butter
1/2 tsp vaniila
2 T evaporated milk
1 c powdered sugar

Over low heat, brown butter until light brown (it will continue to brown once removed from heat).  Add remaining ingredients and pour over warm cake.   *If it's too thick, add more evaporated milk.
{For the cupcakes,  I put this filling in the center and then topped with peanut butter buttercream.}


For the peanut butter buttercream, I just made my regular buttercream and added 1/2 c. creamy peanut butter.  Delish!


I hope you all try this one and let me know how you like it!

Saturday, January 7, 2012

For This Child I Have Prayed

This weekend, I had the opportunity to make a baby shower cake for a surprise shower for one of our friends in Bible Study.  She's having her first baby, a girl in February.   The shower went really well.  She was TOTALLY surprised.  We had fun at the shower; played games, talked, and ate lots of food.  *FYI: I won a coffee mug for sorting and folding socks with the fastest time.*  Glad my mad laundry skills paid off! I digress...

The cake was my signature chocolate with a strawberry buttercream filling, covered in rolled buttercream, with rolled buttercream and fondant accents.   The writing on the cake reads: "For this child I have prayed... 1 Samuel 1:27.


 I brought home the leftovers for Drew. They didn't last long!

Thursday, January 5, 2012

Cupcake Order

Today I had a cupcake order for a lady at my church.  She wanted some of my "hot mama" cupcakes as well as some vanilla cupcakes with strawberry buttercream.  Now I made the mistake of not taking any pictures of them, but I do have a shot of a hot mama mini.  What's a hot mama, you say?  It's a chocolate cupcake with cayenne pepper in it, topped with cinnamon buttercream.  Try it...you'll LOVE 'EM!
Now, I've found a chocolate recipe that I absolutely believe is the best chocolate cake I've ever tasted, but I haven't quite found a vanilla recipe that I'm crazy about...until today.  I found this recipe on Cupcake Project and I think it's a keeper.


Write this down and go bake it!


Yield: 16 cupcakes 
  • 1 cup (225 grams) granulated sugar
  • 1 vanilla bean
  • 1 3/4 cups (175 grams) cake flour, not self-rising
  • 1 1/2 teaspoons baking powder
  • 1/2 teaspoon baking soda
  • 1/2 teaspoon salt
  • 1/4 cup (57 grams) unsalted butter, room temperature
  • 2 large eggs, room temperature
  • 1/3 cup (75 grams) full-fat sour cream
  • 1/4 cup canola oil or vegetable oil (60 ml)
  • 1 tablespoon pure (not imitation) vanilla extract
  • 2/3 cup (160 ml) whole milk
  1. Preheat oven to 350 F (175 C).
  2. In a small bowl, combine sugar and seeds from the vanilla bean. (For those of you who are new to using vanilla beans, check out this video to learn how to get the seeds out of the bean.)
  3. Using the back of a spoon, move around the bowl and apply pressure to break up any clumps of seeds and to better infuse the vanilla flavor into the sugar. Set aside.
  4. In a medium-sized mixing bowl or bowl of a stand mixer, mix together cake flour, baking powder, baking soda, and salt.
  5. Add the vanilla bean sugar and mix until well combined.
  6. Add butter and mix on medium-low speed for three minutes.  Because there is so little butter, you'll end up with a very fine crumb texture.
  7. In a small mixing bowl, whisk together eggs, sour cream, oil, and vanilla extract until smooth.
  8. Add the egg mixture to the flour mixture and beat on medium speed until just combined.
  9. Slowly add milk and mix on low speed until just combined.  The batter will be liquid.  (Don't worry, you didn't do anything wrong.  It's supposed to be that way.)
  10. Fill cupcake liners just over 1/2 full.
  11. Bake for 14 minutes and then test to see if they are done. They are done when a toothpick comes out without wet batter stuck to it.  The cupcakes should appear white with specks of vanilla bean. They should not turn a golden brown.  If they are not done, test again in two minutes.  If they are still not done, test again in another two minutes.
  12. When the cupcakes are done, remove them immediately from the tins and leave them on a cooling rack (or just on your counter if you don't own a cooling rack) to cool.


Read more: http://www.cupcakeproject.com/2011/09/ultimate-vanilla-cupcake-test-baked-by.html#ixzz1j7QDFkXr

Wednesday, January 4, 2012

Chocolate Ganache Pie with Candied Cranberries

For my first official "dessert" post I thought I'd share a new recipe that I tried for Christmas.  I discovered this recipe in the "Home Life" magazine. (*Home Life is a Lifeway publication we get at our church; great magazine...check it out.)


Anyway, back to the pie... Here's the recipe:
1 cup water
2 1/2 cups sugar, divided use
1 (12 oz. pkg) fresh cranberries
9 inch pie crust (*I prefer homemade*)
1/4 cup semisweet chocolate chips
3/4 cup heavy whipping cream
8 (1 oz) semisweet chocolate squares (*bakers brand)


In a medium saucepan, combine water and 2 cups of sugar and cook over medium heat, stirring until mixture comes to a rolling boil.  Let boil for 60 seconds.  Remove pan from heat and cool a few minutes without stirring.  (You can carefully shake or swirl the pan, but stirring at this point will cause the sugar to form crystals.)  Add cranberries to the sugar mixture and stir to coat evenly.  Weight the berries with a plate or flat lid (*My teapot fit into this saucepan perfectly*) and let them sit, submerged, until mixture is completely cool, several hours, or over night.


Drain cranberries in a colander placed over a bowl to catch the syrup.   Reserve syrup.  Place cranberries on wax paper or foil and let them dry.  Sprinkle with remaining sugar and toss gently to coat well.  (*I did this in a ziplock bag*)
Preheat oven to 400 degrees.  Line a 9 inch pie pan with pie crust.  Prick bottom with a fork and line bottom and edges with foil.  Add pie weights (or 2 cups of pintos or rice) and bake for 15 minutes or until golden brown.  Remove crust from oven and remove pie weights.  Immediately sprinkle warm pie crust with chocolate chips.  After 1 minute, use a knife to spread the melted chocolate chips evenly on the bottom of the crust.  (*Confession:  This did not work so well for me and truthfully, I don't think it would have made a huge difference if I had skipped this step.*)
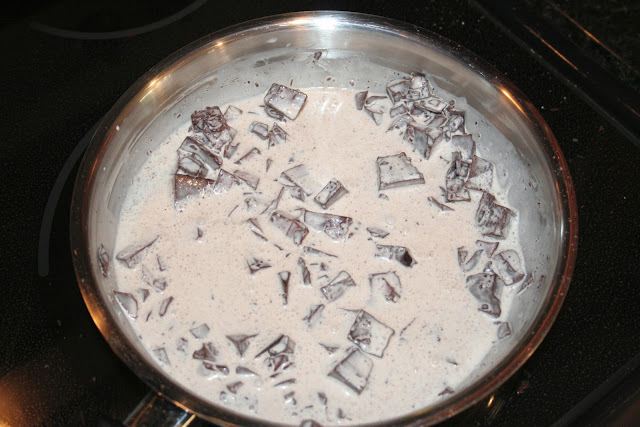
While crust is baking, prepare filling.  Place heavy chipping cream in a medium saucepan over low heat. Add chocolate squares (chop them up first.  They'll melt faster) and stir continuously until chocolate melts. 


 When chocolate appears to be completely melted, remove pan from heat and stir with a metal whisk for 2 minutes.  Pour mixture into pie crust on top of melted chocolate chips.  Allow pie to cool to room temperature and then refrigerate until filling is firm, about 2 hours.
Top pie with candied cranberries and drizzle with some of the reserved syrup.  And voila!
This pie is rich and chocolatey and fabulous and delicious!  It takes a long time to make, but it's totally worth it!  I took it to my husband's family Christmas and it was a winner.  One aunt said, "That was so good that I won't need chocolate again for a month."  It is VERY rich.  The cranberries help to cut down on that richness.  If you're like me and you LOVE chocolate, then please go, RUN, make this pie!  I know I'll be making it again!

Sunday, January 1, 2012

New Year, New Blog!

Happy New Year!  This year, I've decided to do something a little different.  I've created this new blog specifically for my baking.  Some of you are used to following our family blog, so I thank you for joining me here and to all of you who have somehow stumbled upon this blog...WELCOME!  I hope you enjoy reading about all of my "sweet" creations.  
I ask that you bear with me as I get organized and work out all of the "kinks" that come with a new blog.  There will be plenty of pictures, stories, and recipes coming soon.  Until then, keep it sweet and happy baking!